Hi Ho everyone,
Sorry for the lack of updates. I actually did more painting back over the Labor Day weekend, but went for more of a mass update. So no finished models, but lots of progress done. I went for painting some of the darker colors over the models. Next stage is to do the white contrast. Some of these guys are pretty daunting when looking at them. Unfortunately I don't have a time frame for when I'm going to get back to work on them. I was also lucky/unlucky in that some of the other units I was looking for to fill out the army became available from https://mindtaker.org/. That is a great place to get 2nd hand minis (although sometimes what he gets in are NIB or NOS).
Suffice to say, I am officially done collecting Chaos Space Marines. Okay, well almost. I would like to get a new unit of the Chaos Terminators, but I'm really hoping I can find a trade for them. Pic of the models in progress should be coming in the next few days.
Short update, but at least you know I'm still here. Until next time.
Thursday, September 26, 2019
Sunday, August 18, 2019
CSM model #2 done
Hello Gentle Readers,
So I've finished up my second CSM model. All in all, not bad. I have to say, I am still really sloppy when it comes to putting on the gold trim, and then even sloppier putting the nuln oil over it. Ugh, but maybe that's just where I'm at these days. Anyways, very happy with the result. Now I gotta pick another model to start working on. Do I go for one of the bigger guys? Next step up would be the Oblits. Or I could jump straight to the Venomcrawler? Hmmmm maybe doing an Oblit would be good. Guess you'll have to check back to see what I picked. Here's the finished Greater Possessed.


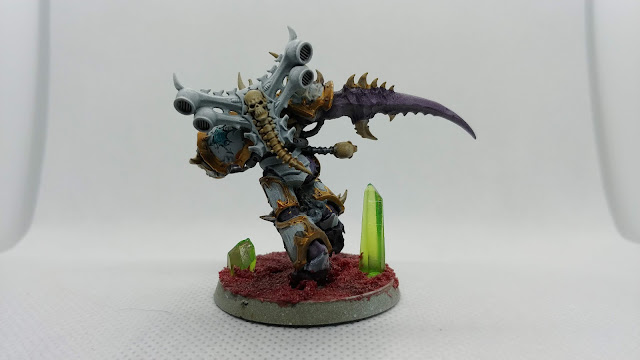


I actually experimented a little with the light box to raise the model a little higher so that I could get the camera looking up a little. I think it worked out. Should be pretty easy to tell which pics uses that technique.
As always, comments are welcome. Until next time...
So I've finished up my second CSM model. All in all, not bad. I have to say, I am still really sloppy when it comes to putting on the gold trim, and then even sloppier putting the nuln oil over it. Ugh, but maybe that's just where I'm at these days. Anyways, very happy with the result. Now I gotta pick another model to start working on. Do I go for one of the bigger guys? Next step up would be the Oblits. Or I could jump straight to the Venomcrawler? Hmmmm maybe doing an Oblit would be good. Guess you'll have to check back to see what I picked. Here's the finished Greater Possessed.


I actually experimented a little with the light box to raise the model a little higher so that I could get the camera looking up a little. I think it worked out. Should be pretty easy to tell which pics uses that technique.
As always, comments are welcome. Until next time...
Monday, August 12, 2019
Greater Possessed update
So this is going to be a short update. I've been working on my chaos process. Last time, I had put down some more contrast paint on the GP model. However, what I had not done was put the Apothecary white on yet. I decided to make that one of the last updates I did so that any error I made during the other colors would be easier to correct. Basically, that theory was correct. I had made a couple of small errors applying the color contrast paints, and I was able to correct them by putting white paint over the mistake and then when I applied the apothecary white contrast, you couldn't even tell any longer.
The last step I have done after applying the Apoth white, was to drybrush matt white back over the armor areas. This was needed to brighten up the white after the contrast white greyed it down. Here's a look and I think the best representation was the backpack.


I suppose I really should have taken a few photos of the model after the apothecary white contrast paint. It really does grey down the white. I want the white to pop more, hence the drybrush. Now I also know that drybrush is for raised areas, and in most cases on this model, the white areas are going to be in the recesses actually. That being said, I knew that some of the areas I wanted to get whiter were going to get hit, and they did. Overall, I got what I wanted quickly. I could go back with a thin white to try to blend the areas specifically, but this model is so detailed, the drybrush worked okay.
Next step is to add the gold trim and then go back to add any other further detail paint. Once the gold is on, I'll carefully apply Nuln Oil over it to shade it. Then I will add the basing material. I actually really liked the simple basing I did on the first guy and have decided to continue that with the whole army.
Feel free to leave comments if you want. Until next time...
Monday, August 5, 2019
Slowly I turned, step by step...
Hello True Believers,
Okay, so its more like "Slowly I painted..." but then no one would get the reference. Probably most won't anyways..but that's okay. Today we are progressing with the Chaos Space Marines. I nearly got sidetracked by the new Space Marine announcements today and was daydreaming about starting a Crimson Fist Primaris army. Wouldn't that be the shit? But no...I hung in there and stayed true to my path.
(Ed. Because who wouldn't want at least one Crimson Fist army right? For us old guys, that is the first chapter we ever saw and most likely, played.)
So I've got a few more models primed...which reminds me, I need to buy more white primer. The last few did not go as great as the spray kept thinning out on me. Of what I own, it looks like I only have three models left to go. So not bad.
For painting though, I've barely touched a thing..but I did pick up the Skeleton Horde contrast color. I knew I was going to have some bone coming up and just thought it would go best if I tried the contrast on it. Can't say I'm disappointed. Holy crap...that might be the fastest way ever to paint undead. Here's a pic:

Check that out. Fantastic bone color and depth. Super cool. So, as you can see the above model is one of the new Greater Possessed models. I've just barely started him. So at this stage, he's primed (twice) and now I'm coloring his mutations with the shyish purple, and the bone with the skeleton horde. I decided it would be best for me to do all of the color parts first. This way if I make a mistake, I can cover with white before I do the apothecary contrast. We'll see how it goes.
So far, I'm pretty happy. The shyish purple is kind of thick, so I suggest using a bit of water on the brush at first to help thin it out. Otherwise, you'll end up trying to thin on the model, and that doesn't seem to work well, you end up with splotches that are hard to cover. I've heard there are a few contrast paints that are like that, so always test first, then figure out if you need to thin it down.
Here's some more photos:


I might go back on the spines on his right claw with white so I can redo those in the bone. That will provide a nice color contrast on the limb I think. I still need to hit the chains with a dark color (still don't own the templar black yet) and then do the white apothecary, then white highlight, then gold and then nuln oil. So lots of steps left to go, we'll see how it pans out.
Well, that's it for now. Feel free to leave comments or suggestions. Until next time...
Okay, so its more like "Slowly I painted..." but then no one would get the reference. Probably most won't anyways..but that's okay. Today we are progressing with the Chaos Space Marines. I nearly got sidetracked by the new Space Marine announcements today and was daydreaming about starting a Crimson Fist Primaris army. Wouldn't that be the shit? But no...I hung in there and stayed true to my path.
(Ed. Because who wouldn't want at least one Crimson Fist army right? For us old guys, that is the first chapter we ever saw and most likely, played.)
So I've got a few more models primed...which reminds me, I need to buy more white primer. The last few did not go as great as the spray kept thinning out on me. Of what I own, it looks like I only have three models left to go. So not bad.
For painting though, I've barely touched a thing..but I did pick up the Skeleton Horde contrast color. I knew I was going to have some bone coming up and just thought it would go best if I tried the contrast on it. Can't say I'm disappointed. Holy crap...that might be the fastest way ever to paint undead. Here's a pic:

Check that out. Fantastic bone color and depth. Super cool. So, as you can see the above model is one of the new Greater Possessed models. I've just barely started him. So at this stage, he's primed (twice) and now I'm coloring his mutations with the shyish purple, and the bone with the skeleton horde. I decided it would be best for me to do all of the color parts first. This way if I make a mistake, I can cover with white before I do the apothecary contrast. We'll see how it goes.
So far, I'm pretty happy. The shyish purple is kind of thick, so I suggest using a bit of water on the brush at first to help thin it out. Otherwise, you'll end up trying to thin on the model, and that doesn't seem to work well, you end up with splotches that are hard to cover. I've heard there are a few contrast paints that are like that, so always test first, then figure out if you need to thin it down.
Here's some more photos:


Well, that's it for now. Feel free to leave comments or suggestions. Until next time...
Wednesday, July 24, 2019
I'm a big fat liar...
So I couldn't help myself. I had to try out a full model. No basing yet, and I'm not quite sure what I want to do there...probably a dark color to help make the armor stand out more. But the rest I think turned out...not so bad.


What do you think? Please leave comments below. If this is what I go with, I'll share the full process next time.
Added a really ugly basing to it just to see...the feet look better with a basing around it.

See you then.


What do you think? Please leave comments below. If this is what I go with, I'll share the full process next time.
Added a really ugly basing to it just to see...the feet look better with a basing around it.

See you then.
CSM update
Hello True Believers,
So I'm taking it one day at a time with my CSM. I'm really digging the white primer over the green. Today, I went ahead and hit one of the models with the Apothecary White contrast paint, to see what it would do. It does dull down the white a little, but it also smooths the transitions in the recesses. Here is a pic that I hope showcases it.
This one is focused on the marine to the right.

This one is focused on the marine to the left.

As you can see, while the right marine is brigher white, you can literally see the speckled texture of the primer on primer. The marine on the left looks much smoother. I think I do like the marine on the left. His next update will be the gold trim detailing.
Might see pics of that this weekend.
Till next time...
Tuesday, July 23, 2019
Small Update
Hello True Believers,
So I just wanted to do a quick update due to some painting experiments I have recently done. I've been trying out some of GW's new contrast paints. These are supposed to really help speed up painting as they give multiple layers of depth in one coat*.
I recently started up a new Chaos Space Marine force and wanted to use them as my first contrast test. The models I had bought were already assembled and primed in a light green color. Most likely GW's spray color, but not really sure. Anyways, using the cool color charts I had found for the contrast paints..
LINK
Gave me some hope that I could use them on the new models. I will also admit that I am very inspired by the Corpus Brethren chapter which is basically white armor with gold highlights. Very cool looking for CSM, but wasn't sure how trying the new contrast white over green was going to work. Well, long story short, it didn't. It turned out really grey...so I did a second coat hoping it would fit it in..and then the whole thing was just grey. So into the dip the model went.
A little more research later, and I should be using white primed models if I want the Apothecary White contrast paint to work. But all of my CSM are green. I have a few options, and clearly the fastest option is to simply prime white over the green.

EDIT: adding more photos as requested...


As you can see, it turned out pretty good. I have some automatic depth from the green undercoat, and now when I use the contrast white, it should smooth out the transitions even more. Super excited about this. Can't wait to finish the model.
Oh, and as to the models in the dip....after just a couple of hours, I pulled them out to see how much paint had come off....well, surprising, just the top layer. All the contrast stuff was off and as I scrubbed the model with a toothbrush, the green undercoat stayed strong. Even the bolt gun paint I put on top came off with no problem, leaving the green primer. So now I just gotta let him dry and I can hit with white. Yay!
Really enjoying painting again. Super excited over these chaos guys. I hope I can do the models justice. Can't wait to finish these up and hopefully finish collecting the planned army for them.
Till next time...
Subscribe to:
Posts (Atom)